Affordable (free) Text to Speech APIs with nodeJS
Similar to experimentation with text translation APIs in a previous post, I wanted to build on this to get some voice out of the translated words. I was surprised to find how far machine generated voice has come at reasonable prices as well. I've proceeded with Microsoft text to speech as the pricing is cheaper than google and the Spanish (latin American) voice sounded more natural than what google provided.
Google Text to Speech
Pricing
The Text to Speech API from google offers up to 4 million characters a month for free, and $4 per 1 million characters after for standard voices. For their higher quality WaveNet voices they offer up to 1 million characters a month free, and $16 per million characters beyond that.
Quality
Google's voice sounds much more robotic than what I was hearing from Microsoft. You can check out some examples here. For Spanish, they unfortunately didn't offer WaveNet voices which are supposed to be closer to natural voice using some machine learning, and their standard voice was, well... not pleasant to hear at all to put it nicely.
Microsoft Text to Speech
Pricing
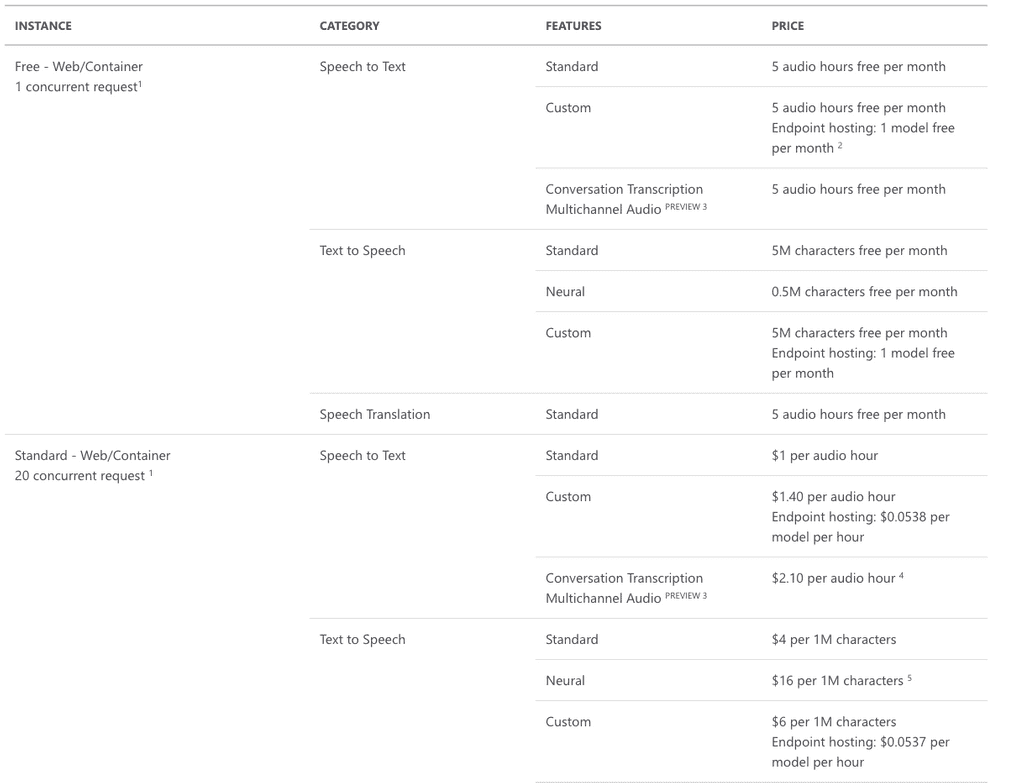
The Text to Speech API API offers a generous free plan of up to 5 million characters free per month, and 4$ per million characters after that, for standard voices (which was the only one available for Spanish):

They also have neural voices which are supposed to be of higher and more natural quality but it is more expensive (0.5 million characters free per month) and didn't offer Spanish that I was looking for.
Step 1: Sign up for text to speech API
You'll need to set up a translation resource and get your service region as well as API key from the console.
Step 2: Implement in node.js
You'll need to look at the supported languages and pick the voice you want. I went with es-MX with voice es-MX-HildaRUS.
Unlike the text translate API we'll be dealing with audio files so using the official SDK made more sense than simple, raw HTTP requests. Some fairly straightforward code to fetch the .wav file from the API:
npm install microsoft-cognitiveservices-speech-sdk
import * as sdk from "microsoft-cognitiveservices-speech-sdk"

// Text to speech
const text = "hacer"
const language = "es-MX"
const voice = "es-MX-HildaRUS"
const filename = "YourAudioFile.wav"

// Set up SDK
const subscriptionKey = "{your-api-key}"
const serviceRegion = "eastus"
const audioConfig = sdk.AudioConfig.fromAudioFileOutput(fileName)
const speechConfig = sdk.SpeechConfig.fromSubscription(
  subscriptionKey,
  serviceRegion
)
speechConfig.speechSynthesisLanguage = language
speechConfig.speechSynthesisVoiceName = voice

const synthesizer = new sdk.SpeechSynthesizer(speechConfig, audioConfig)
synthesizer.speakTextAsync(
  text,
  function(result) {
    if (result.reason !== sdk.ResultReason.SynthesizingAudioCompleted) {
      console.error(result.errorDetails)
    }
    synthesizer.close()
  },
  function(err) {
    console.trace("err - " + err)
    synthesizer.close()
  }
)
Step 3: Compress .wav into .mp3
Since I was going to have thousands of audio files and the quality didn't have to be lossless (its autogenerated anyway), I compressed wav into mp3. There are more efficient and higher quality formats than mp3, but mp3 is the most universally accepted and fairly straightforward to do with the lame library (at least on Mac).
Make sure the lame binary is installed - on mac either download it from the site or use homebrew:
brew install lame
Then install the npm library into your project:
npm install node-lame
Then augment code from step 2:
import * as lame from "node-lame"

// ... all the previous code
synthesizer.speakTextAsync(
  text,
  function(result) {
    if (result.reason !== sdk.ResultReason.SynthesizingAudioCompleted) {
      console.error(result.errorDetails)
    }
    synthesizer.close()

    // Lame code added here
    const encoder = new lame.Lame({
      output: "MyAudioFile.mp3",
      bitrate: 128,
    }).setFile(fileName + ".wav")
    encoder
      .encode()
      .then(() => {
        console.log("done saving mp3")
      })
      .catch(error => {
        console.log("error converting to mp3", error)
      })
  },
  function(err) {
    console.trace("err - " + err)
    synthesizer.close()
  }
)
And you should now have both wav file and a more compressed mp3 file saved in your file directory!
