GatsbyJS + Firebase Auth set up for a blazing fast site in 1 hour (part 1)
The Tech Stack
This guide goes through setting up a working site on a custom domain using some of my favorite tech stacks available today:
- GatsbyJS - a blazing fast static site generator that runs on react and graphQL
-
Firebase - Firebase is a platform from google that lets you rapidly develop things in an elegant way, that otherwise take long. It's also free when you're just starting out.
- Firebase hosting - I'll deploy my statically built site here. This could be anywhere (netlify, vercel etc) but deploying to firebase allows setting up custom domains to work with google auth seemlessly (more on this later)
- Firebase Auth - This is a library from firebase that lets you add all sorts of OAuth from google, facebook, github, etc with just a few lines of code.
Step 1: Start a gatsby project
Run:
gatsby new {your_project_name}
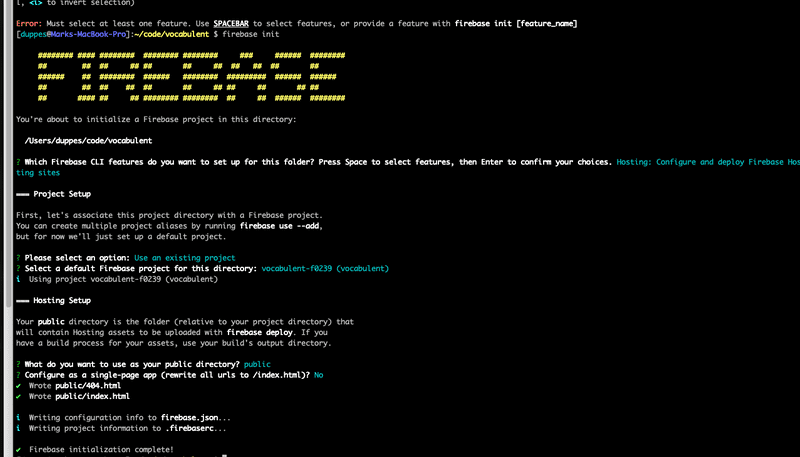
Step 2: Initialize firebase in your gatsby project
If you haven't made a firebase project yet go to their console and set one up, it's free while you still don't have tons of users and you can set up quotas so you're never charged.
Run:
firebase login
firebase init- public directory is fine as it is - its the same as gatsby
- don't set it up as a single page app because gatsby has serverside rendering
Step 3: Update firebase.json
This is described in the gatsby setup guide. This lets firebase hosting know which files could be cached - the cache-control HTTP headers: max-age=31536000 and immutable tells CDNs to cache it as long as possible). This is possible because Gatsby generates a static site at build time so you should always be able to reload the web page from a CDN cache.
{
  "hosting": {
    "public": "public",
    "ignore": ["firebase.json", "**/.*", "**/node_modules/**"],
    "headers": [
      {
        "source": "**/*",
        "headers": [
          {
            "key": "cache-control",
            "value": "cache-control: public, max-age=0, must-revalidate"
          }
        ]
      },
      {
        "source": "static/**",
        "headers": [
          {
            "key": "cache-control",
            "value": "public, max-age=31536000, immutable"
          }
        ]
      },
      {
        "source": "**/*.@(css|js)",
        "headers": [
          {
            "key": "cache-control",
            "value": "public, max-age=31536000, immutable"
          }
        ]
      },
      {
        "source": "sw.js",
        "headers": [
          {
            "key": "cache-control",
            "value": "cache-control: public, max-age=0, must-revalidate"
          }
        ]
      },
      {
        "source": "page-data/**",
        "headers": [
          {
            "key": "cache-control",
            "value": "cache-control: public, max-age=0, must-revalidate"
          }
        ]
      }
    ]
  }
}
Now you can deploy your code to firebase and you should see your gatsby site running on the internet:
firebase deploy
Step 4: Add Firebase Auth
The official docs show you how to import firebase into your javascript code, in this case you can add something like the following to your index.js
// Firebase App (the core Firebase SDK) is always required and must be listed first
import * as firebase from "firebase/app"

// Add the Firebase products that you want to use
import "firebase/auth"

// try to initialize with firebase.init
But when you try to run this via gatsby develop to build it on your local machine, you'll run into some errors. Something related to window not existing, or IDBIndex not defined etc. The issue is that the firebase library assumes it's being executed in the browser, and not on the server with node.js as gatsby tries to statically bundle all your resources together. There are some resources out there to get around this, or discussions on github and various discussions around where to initialize the firebase instance.
I just went with the simple approach of a react hook so we lazy load the firebase library:
// useFirebase.js

import { useEffect, useState } from "react"

// Simply lazy loads firebase imports
function useFirebase() {
  const [firebase, setFirebase] = useState()
  // lazy load it so it doesn't get run on the server
  const lazyFirebase = import("firebase/app")
  const lazyAuth = import("firebase/auth")
  // import other firebase sub-libraries as needed here

  useEffect(() => {
    Promise.all([lazyFirebase, lazyAuth]).then(([firebase]) =>
      setFirebase(firebase)
    )
  }, [])
  return firebase
}

export default useFirebase
Step 5: Add in Firebase Auth for google or any other 3rd party login
To be continued in part 2...
